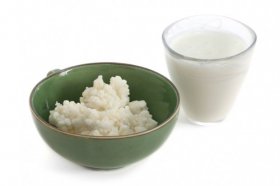
 Kefir is a fermented drink that is one of nature’s finest probiotics. You should consider making it a part of your anti-Candida treatment, along with a course of good commercial probiotics. It should also be a part of your long term diet plan. If you want to beat your Candida overgrowth for good, kefir is a great way to keep your gut flora in balance for years to come.
The beauty of kefir is that it is extremely easy to make at home. Just follow a few simple steps, and every 24-48 hours you can have a fresh batch of kefir ready to go.
Even better, if you find the right grains they will literally last forever. You can keep reusing and reusing them, and you will never run out. So as well as being hugely beneficial to your gut flora, kefir is also a very economical health food.
What do you need to start making your own kefir?
Here is a list of the products and ingredients you need to start making your own kefir.
- Fresh milk (organic is better)
- Kefir grains or a kefir starter kit
- A large glass jar (with lid)
- Wooden spoon
- A plastic strainer
Buy a high quality strain of kefir if you can. The starter kits are great as an introduction, but they will generally last only for 5-7 times before you need to buy another. If you buy a good strain of kefir grains you can keep reusing them as long as you want. In fact the more kefir you make, the more grains you will be left with each time, so you’ll have plenty spare to give to friends and family! When you’ve finished your first batch of kefir, you can place the grains in a little milk and leave them covered in the fridge.
Find a wooden spoon and plastic strainer if you have them. The kefir grains are quite acidic, meaning that kitchen implements made from aluminum, iron, brass or copper are likely to release toxic metals into your kefir or on to the grains. Stainless steel is much less reactive however, and is a good alternative if you don’t have more suitable tools.
Also make sure that everything is really clean. This applies particularly to the glass jar in which the milk and kefir will be fermenting. Any contaminants may spoil your kefir and you’ll have to start over!
Lastly, you will see in step three that we recommend ‘ripening’ the kefir for 48 hours at room temperature after the fermentation process has finished. This is particularly important for Candida dieters, because this extra time significantly reduces the lactose content in the kefir. So if you allow it to ripen, you get all the benefits of the probiotics and none of the Candida-feeding lactose. Additionally, ripening the kefir increases the amount of B vitamins contained in the kefir. As a reminder, Candida sufferers often experience B vitamin deficiencies.
What steps do you need to follow?
Here are the very simple steps involved in making your own kefir. Once you’ve got it right once, you can keep making it over and over again.
Step One
Make sure your glass jar and its lid are both very clean. Place the kefir grains in the jar first, then pour the milk over them. A typical ratio is 3 tablespoons of kefir grains for every quart (or liter) of milk. Gently stir the mixture for a few seconds then place the lid on the jar. Leave the lid slightly loose so any excess pressure can escape.
Step Two
Leave the jar somewhere in your house at room temperature but out of direct sunlight. The fermentation process can take anywhere from 12 hours to 48 hours, depending on how you like your kefir. As a rule, less time in the jar will produce a sweeter, thinner kefir, whereas a longer fermentation will result in a thicker, more sour kefir. After some time you may also see the kefir separating into two layers – a thick, white curd at the top, with a thin, yellowy whey underneath. The kefir is OK to consume at this stage but will be quite sour, so as soon as you see any signs of separation it’s probably best to move on to step three.
Step Three
When you think your kefir is done, give the jar a quick stir and then pour its contents through the strainer. This will separate out the liquid kefir from the grains. You can store your liquid kefir in the fridge or at room temperature for a few days. In fact, storing your kefir at room temperature for a day or two will help it ripen, increasing the nutritional content and allowing most of the lactose to be fermented away (this is even better for Candida dieters). As for the grains, don’t throw them away! You can use them again and again. If you are not going to make another batch of kefir straight away, place the grains in a bowl with a small amount of milk and store them in the fridge.
Can you use a different type of milk?
You can use almost any kind of milk to make your kefir. In fact, you can even make it using just water, although your kefir is likely to end up a little runny and thin.
Thicker milks will always give the best results. Depending on where you live, the thickest milk might be labeled as 3.25%, whole or full-fat milk. Skimmed milk will also make good kefir, but it won’t have that same, satisfying taste as it gets from regular milk.
Coconut milk is another great alternative for your kefir. It has a good consistency, perhaps even slightly thicker than regular milk, and of course you get the antifungal benefits of the caprylic acid in the coconut too.
YOU MIGHT ALSO LIKE


