Water Kefir: Rinse, Rest, Recover
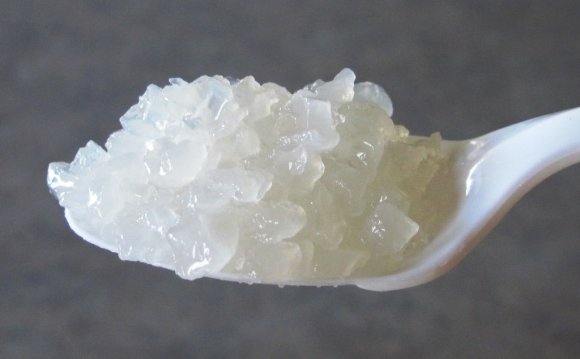
Water kefir is a delicious and refreshing drink, loaded with probiotics and easy to make. Under ideal conditions, you can put a couple of tablespoons of water kefir grains in a quart of sugar-water, coconut water, or fruit juice, let it sit for a day or two, then strain, add flavoring, and let ferment for a few more days. The result will be a light, slightly fizzy drink that kids and grownups love to drink.
However, there are a few problems that can come up when the grains are stressed from overcrowding, lack of nutrients, or contamination. These problems include:
Grains are slimy.
Kefir is syrupy.
Kefir smells bad. (Sulfur smell, smells like rotting fruit, smells “like feet, ” etc.)
White film forms on the top of the kefir.
Grains start to diminish in volume.
These problems can be a result of the kefir not properly re-building themselves, which is a result of undernourishment. Or, it can be an imbalance in the bacteria and yeasts in the culture, which can come from undernourishment, or overnourishment, or just the wrong ingredients.
Kefir grains need not just sugar as food; they also need minerals. It’s very easy to supplement with minerals when needed. However, while minerals are essential to the good health of water kefir grains, they can also get too many minerals, or an imbalance. Or, they can change their requirements for minerals: having had enough of one mineral, they may now need a different one!
Often water kefir grains will benefit by a short time “on vacation” so they can re-balance and. So while adjusting the ingredients in your water kefir can be helpful, sometimes it’s a good idea to let the grains rest a little as well.
Here’s how to give your grains a “rest and recover” treatment that will get them back on the road to robust productivity.
Make a Resting Solution
Start with fresh, clean water. Make sure it does not have fluoride in it. If your tap water is fluoridated, it is not likely that an ordinary house filter will remove it. You will have to use bottled spring water, or get a filter specially designed to remove fluoride. Chlorine can be removed by filtering, evaporation, aeration, or boiling. Chloramines, used instead of chlorine in some municipalities, must be filtered out.
Bring the water to a boil and let it cool for five or ten minutes. (If you boil for 20 to 30 minutes, it will also remove the chlorine.) You will need a quart for the resting solution, plus a quart or more for rinsing the grains.
In a quart-size mason jar, put 4 tablespoons of granulated sugar. The best type to use is an unrefined organic sugar such as turbinado, Sucanat, evaporated cane juice (unbleached), rapadura, etc. You can also use white table sugar. Don’t use honey, agave, coconut sugar, or any other type of alternative sugar. (Some of these are okay for culturing, but you want to just keep it simple for now.)
Now, depending on the mineral content of your water and the condition of your grains, you might need to add some mineral supplementation. Small, mushy grains can usually benefit from some minerals. Syrupy kefir is usually a result of too many minerals. If you have an idea of the mineral content of your water, add minerals to soft water, or leave them out of hard water.
You can choose any one of the following:
1/8 teaspoon unrefined sea salt
1/4 teaspoon plain baking soda
1/2 teaspoon unsulfured blackstrap molasses
A few drops of liquid mineral supplement (such as Concentrace)
1 teaspoon oyster shell (sterilized, the kind that is used in aquariums), or sterilized, crushed eggshell (If you use oyster shell or eggshell, put it in a muslin bag so it doesn’t get mixed up with the grains.)
Fill the mason jar with the boiled water to about an inch or two from the top, and let it cool to room temperature. Set the rest of the water aside. When it is cool, you can rinse the kefir grains.
(Alternatively, you can use just enough boiled water to dissolve the sugar, and fill the jar with cool, filtered water.)
Rinse the Grains
Ordinarily you should not need to rinse the kefir grains, but if they have gotten to the point where they are slimy or stinky, it’s a good idea to clean them off.
Put some filtered or boiled, cooled water in a shallow bowl, and set up a plastic mesh strainer so you can put the grains in the strainer and have them bathed in the water.
Stir the grains around in the strainer gently with your finger, brushing them lightly up against the strainer. This will clean off any loose yeast or contaminants off the surface of the grains without damaging them.
Pour off the water, which will be cloudy.
Repeat the rinsing a few times until the discarded water is pretty clear. Your grains are now “naked” and ready to rest.
Rest the Grains
Put the cleaned grains in the prepared solution, and cover the jar with a plastic lid. (If all you have is a metal lid, put a coffee filter over the top of the jar, then put the lid on top of that.)
Now put the jar of grains and water in the refrigerator and leave them there for at least three or four days. The cold will put the grains to sleep. They can stay in the refrigerator for as long as a month, resting and rebuilding.
Get the Grains Back to Work
After your grains have rested, you are ready to make a new batch of kefir.
Set up the new kefir solution the same way you made the resting solution, with clean water, granulated sugar, and mineral supplementation if needed.
Strain the grains out of the resting solution. If you want, you can save the liquid. If it has only been in the refrigerator for a few days, it will be mostly sweet water with some probiotics in it. If you left it in the refrigerator for a long time, it may be very lightly fizzy and can be treated like kefir. In any case, it should smell better than it did before you started. If the grains still seem distressed (slime, bad smell, or white film), make a new batch of resting solution and rest the grains again.
Add the rested grain to the new kefiring solution. You should have between 2 and 4 tablespoons of grains to a quart of water. If you have more grains than that, you can either divide them into smaller batches and make more jars, or use a larger jar. Make sure you maintain the right proportions of sugar and minerals in the water.
YOU MIGHT ALSO LIKE


