
 I have been making my own coconut milk Kefir for quite a while now. But recently, I began to crave the thicker creamier consistency of yogurt. So, I did some experimenting. Coconut milk yogurt is very easy to make (almost as easy as coconut milk kefir, but perhaps not quite so forgiving). Empty a can of full-fat Coconut Milk (or equivalent volume of homemade coconut milk) into a 1 pint mason jar. Heat to 115F (that is exactly 1 minute with my microwave). Many recipes suggest heating to 180F first and then letting it cool to 115, which I don’t bother doing because I’m either using freshly made coconut milk which is still warm or canned Coconut Milk. Next, add 1 Tbsp of store-bought coconut milk yogurt (I used plain So Delicious coconut milk yogurt that I bought at Whole Foods). You could also use a non-dairy yogurt starter or a spoon of regular yogurt. Either way, for future batches, just use 1 Tbsp of the previously made batch of yogurt. Place in a warm place for 8-24 hours (I put mine into my oven, off but with the oven light on, ideally it should incubate between 105F-112F; you can also use crock-pots, food dehydrators or yogurt makers). It produced a lovely tasting sour yogurt. However, much to my dismay, coconut milk yogurt does not thicken on its own(it doesn’t have the right proteins).
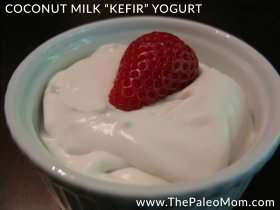
Every recipe I found online either used thickeners or suggested straining the yogurt afterward. So, once again, I experimented. I tried thickening with Pectin, but didn’t like the fact that I had to add honey or sugar to the coconut milk in order for this to work (even with pectin designed for no sugar added applications) and pectin without added preservatives are hard to find. Also, I felt that it changed the taste (maybe it was the preservatives). I tried thickening with Gelatin (I actually like the idea of adding those great gelatin amino acids to my food), but really disliked the texture it created (more like jello than yogurt). Last, I tried straining my homemade yogurt through a folded piece of Cheesecloth. Success! The result is creamy yogurty goodness. But, then I got thinking. Given all the extra work it is to make yogurt compared to the kefir I was already culturing, couldn’t I just strain the kefir? The answer was yes! Plus, kefir is richer in diverse probiotics compared to yogurt, so it’s even better for you. Best of all, using kefir as a starting point compared to yogurt is much more fool proof and controllable. (I have tried to give you enough details here to culture yogurt instead of kefir if you happen to have yogurt starter or a yogurt maker in your home that you are dying to use. The staining steps are the same.)
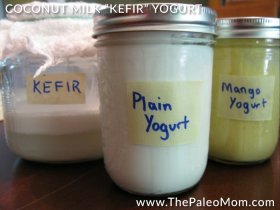 I bought my starter Kefir Grains from amazon (you also might be able to find them in your local health food store). Following the directions from the manufacturer and from Mark’s Daily Apple, I initially got my kefir grains going with organic whole cow’s milk. They grew in a glass mason jar in ½ cup of milk and a folded piece of cheesecloth held over the top with the ring part of the lid (an elastic band and a piece of paper towel or coffee filter work too). I changed the grains by pouring the milk through a metal sieve and then dumping the Kefir Grains into a clean glass jar with fresh milk. I changed the milk daily for 5 consecutive days and then I just dumped those little kefir grains into half a can of Coconut Milk and let them go for 48 hours. It worked! The result was a sour, tangy, and very pleasant beverage which I liked to pour over a bowl of fresh berries. Initially I used light coconut milk (it’s just so temptingly cheap at Trader Joe’s but it really can’t compete with full-fat coconut milk so I don’t buy it anymore). I enjoyed the beverage even more when I moved to homemade coconut milk or full-fat canned coconut milk. And my kefir grains started growing much faster once I started growing them in the full-fat milk. My grains have more than quadrupled in size since I bought them about three months ago (I now have some dormant kefir grains sitting in cow’s milk in my fridge) and they can ferment a can of coconut milk to the very sour that I enjoy in 24 hours or 2 cans in 48 hours (I like to do the latter since it’s less work). Please note that if you want to make yogurt without the use of thickeners like pectin or gelatin, you need the fat content of either homemade or full-fat canned coconut milk to get that creamy texture.
Straining coconut milk kefir is very easy. If you don’t want to invest in a Yogurt Cheese Strainer or a Kefir Cheese Strainer, you can simply use a clean linen tea towel, a square of muslin or about 12-14 layers of Cheesecloth lining a metal sieve. All of them work. What does not work is a nut-milk bag or a paint straining bag because the weave is just too big. I have typically been using cheesecloth but just ordered myself a Yogurt Cheese Strainer, which I’m very excited about because it will be more sustainable. When my kefir is ready (you can test simply by tasting it and see if it’s yummy), I first pour the culture through a metal sieve to catch the kefir grains for the next batch (if I have alot of curd, I gently push it through the metal strainer with a rubber spatula to separate out the kefir grains). Then I pour the kefir sans grains into whatever straining method I am using suspended over a bowl to catch the whey. I then place it in the fridge (if you strain at room temperature, it will continue to get more sour and end up more like a fresh cheese than a yogurt). It takes 1-12 hours to drain enough of the whey to make the thick, creamy yogurt that I prefer, depending on exactly what strainer I’m using (linen takes the longest, close to 24 hours with canned coconut milk, and cheesecloth takes less time, 1-2 hours with homemade coconut milk) and depending on whether I’m using canned Coconut Milk (takes longer due to the guar gum content) or homemade coconut milk (separates more easily, sometimes the curd is so thick you can even skip the straining step, see note at bottom of recipe). When it’s done, I use the whey for smoothies and scrape that yogurt into a jar and store in the fridge until I’m ready to eat it.
YOU MIGHT ALSO LIKE


Share this Post
latest post
-
 Six Star Pro Nutrition Casein protein July 18, 2018
 -
 What foods have Casein protein? July 15, 2018
 -
 Kefir grains at whole foods July 12, 2018
 -
 Cultured milk products July 9, 2018
 -
 What stimulates milk production? July 6, 2018
 -
 Milk and mucus production July 3, 2018
 -
 Does whey protein have Casein June 30, 2018
 -
 What is Micellar Casein protein? June 27, 2018
 -
 Casein protein necessary June 24, 2018