- Jar or crock (we prefer a stoneware crock)
- Real Kefir grains
- Raw milk (preferably from Certified Organic Jerseys!)
- Cloth or towel
- Colander or strainer (holes should be about 16th in. diameter)
- Bowl (one size smaller than the colander)
- Wooden spoon or spatula
To start the process:
- Place the entire contents of “Kefir Starter Grains” into the crock or jar.
- Pour 1 quart of milk over grains. (Keep down 1” or so from rim as milk will expand.)
- Cover with a cloth or towel to keep flies/dirt out but still let oxygen in.
- Let sit at room temperature for 24 hours to culture. Do not set in sunlight.
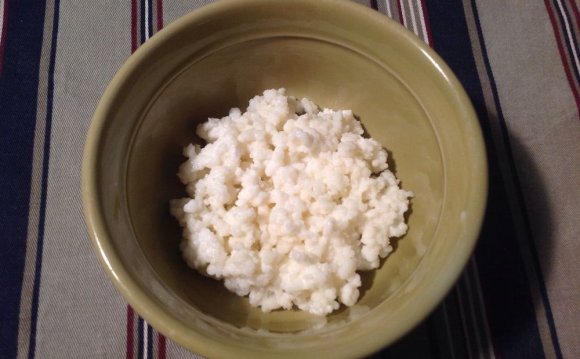
- Stir the cultured Kefir to break up the thickness to make it easier to strain. Do not be alarmed at the curdled look of the Kefir. Curds are a perfectly normal part of cheese, yogurt or Kefir making.
- Set the colander on top of the bowl and pour the Kefir into it. Use the spoon to help the Kefir through. Do not rinse the grains after you strain them. In fact, it would be better to leave a few curds with them.
- Return the grains to the fermentation crock to be ready for the next batch. After several batches, you’ll notice that you have more grains than you started with. When you have 1 cup or more, you may start culturing ½ gallon at a time…or, find a friend who wants some Kefir Grains!
- Place the freshly strained Kefir in the refrigerator to chill.
- Puree your choice of fruit (frozen is best) in a food processor or blender. Then add the chilled Kefir along with sugar, maple syrup or other sweetener to suit you taste. It is totally up to you to decide how sweet you like it or what flavors to add. We enjoy banana, peach, strawberry, blueberry, nectarine, orange, apricot or even a blend of several. Your imagination is the limit!
Mothers, try freezing cool pops with Kefir instead of cool-aid. Your children will love them! Or freeze a pan of Kefir and then process the frozen Kefir with frozen fruit, and a little extra sugar. It tastes almost exactly like sherbet.
To start the next batch:
- Place the grains in the fermentation jar, refill it with milk and repeat the whole process.
To take a short break from Kefir making:
- Place the grains in a small container, cover with milk, cover container with a paper towel or cloth secured by a rubber band, and refrigerate. The cold temperatures will only allow a very slow fermentation. Important: Change the milk every few weeks so the probiotic bacteria do not starve. The first batch or so will take longer than 24 hrs to ferment till the grains get revived from their dormancy.
To take a long break:
- Rinse the grains with water and lay them on a paper towel to dry. When they are totally dry, place the grains in a container and store in your kitchen cupboard. They have been known to keep up to 2 or 3 years like this. When you are ready to start again, simply place the grains in milk like you would for a normal batch of Kefir. The first batch or so will take longer than 24 hrs to ferment till the grains get fully rehydrated and revived.
If you use an antibacterial soap or something like Clorox to wash the container you are using for fermenting, be very careful to rinse it well as any residuals will kill the grains. It is actually not necessary to wash your fermentation jar every time. The little bit of Kefir left on the inside will help start the next batch.
Source: www.yourfamilyfarmer.com
YOU MIGHT ALSO LIKE

Milk Kefir Activation

How to Make Authentic Milk Kefir
Milk Kefir For Dummies
Share this Post
latest post
-
 Six Star Pro Nutrition Casein protein July 18, 2018
 -
 What foods have Casein protein? July 15, 2018
 -
 Kefir grains at whole foods July 12, 2018
 -
 Cultured milk products July 9, 2018
 -
 What stimulates milk production? July 6, 2018
 -
 Milk and mucus production July 3, 2018
 -
 Does whey protein have Casein June 30, 2018
 -
 What is Micellar Casein protein? June 27, 2018
 -
 Casein protein necessary June 24, 2018